 |
General Tips at your command! |
Money Saving Tip Save yourself time and money by purchasing a volt-ohm meter. Volt-ohm meters are used to find electrical malfunctions in your home. Electricians use them all the time; so why not save yourself the money of hiring one by learning how to use one of these meters safely. Click here to order: | 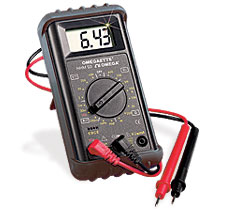 |
Test devices in your home with an analog volt-ohm meter. Analogs have the needle that makes it easy to detect the subtle fluctuations of devices. These meters also are available in digital--which are good. But the digital meters do not detect subtle fluctuations of voltage as it travels into the device. Volt-ohm meters test voltage, ohms and amps. Touch the two probes together prior to testing then "zero out" the meter for an accurate test.
Test the resistance of devices by using the ohms scale on the meter which shows how devices conduct electricity.
Test how much electrical current a device is using by utilizing the amp scale on the meter.
Test the life of batteries safely by using a volt-ohm meter. The meter will show if there is still life in the batteries. Use the meter to test battery operated toys also. Match the polarity of the probes with the batteries.
Test with a digital volt-ohm meter to get the "auto range" which automatically selects the highest range the device can have safely before you test the device. This is helpful when you are switching back and forth between testing for volts, ohms and amps.
Unplug then test extension cords and cords to devices with the meter. Zero indicates a closed circuit, while infinity indicates an open circuit. If the reading is infinity, that means the cord has a break somewhere and should be replaced.
The General's Vacation Tip:

HYDROGEN GAS IS EXPLOSIVE!
Under certain conditions, hydrogen gas may be produced in a hot water system that has not been used for 2 weeks or more. If the hot water system has not been used for such a period, before using the washing machine, turn on all hot water faucets and let the water flow from each for several minutes. This will release any accumulated hydrogen gas. As Hydrogen gas is flammable, do not smoke or use an open flame during this time.
The General's orders for reading appliance model numbers
- You are ordered to read the model number directly off the manufacturer’s tag affixed to the appliance.
- You are ordered to use these diagrams to help you locate the manufacturer’s tag if you are having trouble.
- You are ordered to not offer up the excuse that the manufacturer’s tag could not be located on the appliance; Federal law mandates these tags.
- You are ordered to read the model number under the illumination of a flashlight.
- You are ordered to not offer up the model number unless it was read under the illumination of a flashlight.
- You are ordered to double and triple check the accuracy of the model number before offering it up.
- You are ordered to not offer up a model number until its accuracy has been double and triple checked.
- You are ordered to not offer up any model number found on any printed manuals associated with the appliance.
- You are ordered to not omit the three digit number to the left of the decimal point in the model number for a Kenmore appliance.
- You are ordered to thank and praise yourself for not wasting yours and my time.
Kenmore Washer Information
This advice is for Whirlpool Duet & Kenmore Elite model FRONT LOADER washing machines experiencing the SUDS lock error code.
The "SUDS" error can be caused by too much detergent, improper detergent, drain pump/drain line problem, or pressure switch malfunction.
1. If you are not using HE detergent, you need to be. These washers are designed to use HE detergent which is formulated for wash tubs that use 5 to 7 gallons of water. If you use regular detergent, you are, in affect, placing a higher concentration of detergent in the washer that is normally formulated for wash tubs that have a 35 gallon capacity. The manufacturer should have a disclaimer in the owner's manual explaining this. In most cases this will also void your warranty. NOTE: Prolonged use of the wrong detergent can damage the drain pump components and or wash tub seals.
If you are using the correct detergent, double check the label to make sure it is not double (2X) or triple (3X) concentrated. You could still be placing too much soap in your wash.
To get rid of excessive detergent, place the washer on a RINSE & SPIN cycle, then run it through a normal wash cycle with NO detergent added. You may have to repeat these steps depending on the amount of detergent used.
2. If you do not have a detergent issue, double check the drain pump and drain lines to ensure they are not obstructed in any way. Click on the following link for step-by-step instructions:
http://www.fixya.com/support/r385844-checking_drain_pump_kenmore_elite_front
Obstructions in the drain pump and/or drain lines can attribute to air getting trapped in the drain pump and cause the error code. Double check all electrical connections to the drain pump and Central Control Unit (CCU). You will need to remove the top panel of the washer to access the CCU. This is accomplished by removing the three screws in the back of the washer that hold the top panel in place. With the screws removed, slide the panel back, then off. The CCU is located directly behind the wash tub in the center of the washer. The Drain Pump connector will be the 6th connector (facing from the front L to R) in the center of the CCU.
3. Check the Pressure Switch to ensure it is good. The Pressure Switch is located to the right of the CCU as you are looking from the front. It is a small cylindrical shaped device with a connector plug and an air hose attached. The switch can be checked at several water levels by removing the plug and taking resistance readings at the connector pins. Readings are as follows:
(Pins are numbered R to L facing the from the REAR)
Pins 1 to 2 (SUDS Detect) – 0 ohms
Pins 3 to 4 (Overflow) – 0 ohms
Pins 4 to 5 (L1) – 0 ohms
Pins 4 to 6 (Empty) – 0 ohms
This advice is for Whirlpool Duet and Kenmore Elite model FRONT LOADERS displaying the “F05” Error Code.
"F05" is an indication of a water temperature sensor (NTC) error, or Heating Circuit failure. Check the Water Temperature Sensor and check connections to the Water Temperature Sensor. To access, you will have to UNPLUG your washer and remove the lower access panel under the door. The panel comes off by removing the screws under the bottom edge. HINT: If you place a block of wood under each front foot of the washer, it will make access to the screws much easier. If the panel sticks, a tap on the sides will knock it free. The panel will drop down then come off. The sensor (NTC) is located at the base of the wash tub in the front on the heating element. This will be a small square shaped plug between the heating element terminals. Unplug the wire harness and take a resistance check. Readings will be as follows:
Temperature Meter Reading
32°F (0°C) 35.9 K ohms
86°F (30°C) 9.7 K ohms
104°F (40°C) 6.6 K ohms
122°F (50°C) 4.6 K ohms
140°F (60°C) 3.2 K ohms
158°F (70°C) 2.3 K ohms
203°F (95°C) 1 K ohms
Roughly...around 9K ohms at room temperature if I'm reading the chart correctly. Take readings as listed and also double check the connector to make sure it is not oxidized. Try cleaning the plug and reconnecting to see if the error code goes away. If not, you will probably have to replace the sensor. If the sensor checks good, take a reading across the heating element terminals. It should indicate about 15 ohms.
Lastly, remove the washer top panel by removing the three screws holding the panel in place in the rear. Once the screws are removed, slide the panel back then off. Locate the Central Control Unit (CCU) directly behind the wash tub. Take a resistance check at the Heating Element Solenoid by removing connector 9 from the CCU (this is the second connector from the RIGHT as facing from the front). A reading across test points 1 & 2 should also read 15 ohms
This advice is for Kenmore Elite and Whirlpool Duet model front loading washers.
If you experience a problem where the door becomes jammed and will not unlock or open, here's an easy way to gain access inside your washer WITHOUT calling the repairman.
1. Remove the lower panel under the door by loosening the three screws under the bottom edge on the front of the washer. HINT: If you prop up the front feet of the washer with some small blocks of wood, this will make access to the screws much easier.
2. With the screws removed, the lower panel should drop down then come off. If the panel sticks, a light tap on either side will knock it loose.
3. Reach your hand up inside the washer behind the front casing on the right-hand side. This is where the door latch assembly is located.
4. At the bottom of the door latch assembly is a small pull tab. This is the manual release for the door. Pull the tab straight down and the door will come open.
Sometimes these doors will not unlock for whatever reason. If there are no error codes being generated, this could have just been a momentary glitch. If you see "Fdl" or "Fdu" error codes, these are usually indications of a failed door latch assembly and will require replacement. You can click on the following link if you need step-by-step instructions on how to replace the door latch:
http://www.fixya.com/support/r587965-door_latch_replacement_fdl_error
This advice is for Kenmore Elite and Whirlpool Duet model FRONT LOADERS displaying the “FH” error code.
"F/H" indicates that either you have no water coming into the washer, or very little water.
If you have NO water coming into the wash tub after 30 seconds the error code is displayed. Check the following:
- Inlet water valve may be clogged. Clean inlet screens if necessary.
- Make sure water taps are on.
- Check inlet hoses for kinks or clogs.
If you HAVE water filling the wash tub, and after 8 minutes, 10.5 gallons of water has been detected by the flowmeter, but there has not been a detected a Pressure Switch trip, the inlet valves are turned off and the error code is displayed. Check the following:
- Make sure you don't have a siphoning problem. Click the following link for instructions: http://www.fixya.com/support/r587481-prevent_washer_siphoning
- Verify Drain Pump operation.
- Verify Flowmeter operation.
- Verify the Pressure Switch hoses are intact and connected properly.
To access the Drain Pump - UNPLUG the washer and take the lower panel under the door off by removing the three screws under the bottom edge. HINT: Propping the front feet of the washer up can make access much easier. I use a couple small blocks of wood. With the screws removed, the panel should drop down then come off. If it sticks, tap either side and it should come free. The pump is located directly under the wash tub in the front of the washer. Verify the electrical connections are good and that the pump is running. If not, click on the following link to check the pump for obstructions:
http://www.fixya.com/support/r385845-checking_drain_pump_in_whirlpool_duet
To access the Flowmeter and Pressure Switch – remove the three screws in the top panel along the back of the washer. With the screws removed, the panel should slide back, then, lift off. The flowmeter will be located on the left-hand side of the washer (facing from the front) between the inlet valve and dispenser. It’s a small white plastic device with hoses attached. The pressure switch is located on the right-hand side of the washer in the rear. It is a round plastic device with electrical connections and a hose attached.
There should be a tech sheet directly behind the panel or attached to one of the interior cabinet walls. Please refer to this sheet to learn how to perform diagnostics, how to locate the components mentioned, and the specific measurements required determining if the components are good or bad.
-
Theory of Operation
-
Preventing Dryer Fires
-
How to convert 3 prong to 4 prong 240 volt wiring
-
Major Links
-
Service Center Locators Team
- With the appliance UNPLUGGED, remove the access panel on the back of the unit where the power cord enters.
- With the cover removed, you will see a terminal block where the power cord is attached. The terminal wires will be colored with the WHITE wire in the middle, and the BLACK and RED wires on either end. NOTE: There should be a green jumper wire or metal bonding strap attached to the NEUTRAL (white) terminal wire.
- Remove the terminal lugs holding the old power cord wires in place. CAUTION: Use care not to drop any nuts or screws inside the appliance.
- Remove the bonding strap or ground wire from the Neutral terminal lug. NOTE: If disconnecting a ground wire, make sure you re-attach it to the appliance frame.
- Loosen the screws on the strain relief connector that holds the power cord in place and remove old power cord. NOTE: If your appliance does not have a strain relief that clamps down and hold the power cord in place, it is highly recommended that you install one. This prevents chaffing of the power cord against the appliance casing, and prevents the terminal wires from being pulled and broken loose. This could pose a potential shock hazard or cause damage to the appliance.
- Install new power cord by threading it through the strain relief connector and tighten down the screws.
- Connect the new power cord to the corresponding colors at the terminal block (Black goes to Black, Red goes to Red, White goes to White). The difference is going to be a Green (ground) wire that will connect to the appliance frame. There’s usually a green grounding screw for this. NOTE: If you disconnected a green grounding strap in Step 4., you can connect these two wires at the same point.
- Re-install access cover. Turn off the service breaker to the appliance PRIOR to plugging it back in. With the breaker in the off position, plug the appliance in, and THEN turn the breaker on. In the event, something was wired incorrectly, it is far better to have your hands away from the receptacle and controlled from a distance. Safety first.
- If you desire to convert an appliance from a 4-prong to a 3-prong, make sure you reconnect the bonding strap and/or ground wire to the Neutral (white) wire at the terminal block.
- On some newer appliances, it is REQUIRED that you use a 4-prong plug in order for the timer or clock circuits to function properly due to the way they are configured. Refer to your owner’s manual for the correct recommendation. Even if you currently have a 3-prong receptacle, you still may be required to upgrade to a 4-prong if you encounter this situation.
- In many circumstances, new appliances are NOT sold with the power cord due to the various power configurations in homes. Always refer to the contents description on the shipping container the appliance comes with to see what additional items or tools may be required for installation.
Dryer Theory of Operation
This advice is general in nature, but should assist you in isolating MOST dryer malfunctions.
Normally when a dryer starts to exhibit longer dry times, then suddenly stop working, it is an indication that the Thermal Cut-Out (TCO) or Heating Element has blown. But…what causes this to happen?
First, a little dryer theory: A dryer needs air to breath. Proper ventilation is required for the heating circuits to regulate the internal air temperature properly. If you have to keep placing items back in the dryer to dry again, or the dryer just doesn’t seem to be putting out hot enough air, it may be time to think about checking the dryer vent ducting (a simple separation of more dense clothing from lighter weight clothing can help shorten dry times too). If the heating circuits are starved for air they actually OVERHEAT and can cause problems. This is why the outside case can feel hot, but the drum inside feels cold. The TCO acts as a fuse for the heating element circuits. When an overheat condition occurs, the hi-limit thermostat is supposed to open to shut off the heating element. This is how the dryer regulates its heat. However, if the hi-limit thermostat malfunctions, the TCO will blow. This device acts as a fuse, is not resettable, and has to be replaced. This also means that the hi-limit thermostat could be suspect and it should also be replaced at the same time. Most manufacturers recommend replacing the two components together and are sold as a set.
Now...if your dryer has been having problems drying, the first thing you need to check is the ventilation ducting to ensure that it is not kinked or clogged. Poor air flow is the number one cause of dryer failures. Not to mention it can cause fires due to lint backing up inside the dryer. This could be the "electrical" smell a lot of people complain about. If lint accumulates on the heating element it will smolder and burn. It is often reported that you should clean your ducting twice per year. I recommend the ducting be checked (this means inspected to see if it needs cleaning) thoroughly about once per season. That's 4 times per year. If you've never cleaned the ducting, or your dryer is pushed all the way up against the wall causing the ducting to become kinked, you will have air flow problems. One way in determining air flow is to remove the vent hose from the back of the dryer and start the dryer (of course, you need a working dryer in order to do this). The air should be forceful and slowly warm up to about 140 degrees. If the air flow is weak, you may have a clog inside the air baffle of the dryer (this is where the lint screen slides into). If the air flow is good, reattach the dryer hose and check at the output of the dryer vent as it exits your home. If the air flow is weak or non-existent then you know you have a clog in the vent line somewhere. Periodic cleaning will go a long way towards preventing future clogs. Dryer vent rule of thumb: The SHORTER and STRAIGHTER the vent line, the BETTER. Everywhere you have a bend or kink is an area where you will create potential collection points for lint. Poor dryer maintenance is also one of the frequent causes of house fires.
How to troubleshoot a dryer: If your dryer has the lint screen on top of the unit, you will need to remove the back panel to get to the heating circuits. If your dryer has the lint screen in the door, you will need to remove the lower kick panel under the door by pushing in on the release tabs with a putty knife. They are located along the front seam about two inches in from each side. CAUTION: It is recommended that you unplug the dryer BEFORE servicing the inside or cleaning. There are still dangerous voltages present even with the machine turned off.
Symptom:
Dryer Runs, But Does Not Heat:
Suspected Components:
1. Heating Element (located inside the heater box) - Resistance reading should be 9-13 ohms.
2. Thermal Cut-Out (located on the heater box) - Resistance reading of 0 ohms.
3. Hi limit Thermostat (located on the heater box closest to the heating element leads) – Resistance reading of 0 ohms.
4. Operating Thermostat (located on the air baffle) - (May have 4 wires attached to it). Will read 0 ohms across one set of leads, approx. 7 ohms across the other.
5. Bad Heater Relay (usually located in the console) – this is not equipped on all model dryers. However, on dryers that DO have them, this acts as a switch and turns the heater circuits on at the push of the START switch.
Dryer Does Not Run At All:
Suspected Components:
1. Thermal Fuse (located on the air baffle) - Resistance reading of 0 ohms. NOTE: If the thermal fuse is blown, the drum light will not come on.
2. Broken Drum Belt - If dryer is equipped with a broken belt relay, this will shut the dryer down.
3. Broken Door Switch - If the door switch is broken, this will shut down the entire dryer as no power is applied to the start switch with the door switch open.
4. Bad Start Switch - If the start switch does not toggle close or stay closed when released, the dryer will not start.
5. Bad Timer - If the timer does not function the dryer will not start.
7. Bad A/C Receptacle and/or Connector Plug - If you aren't getting the proper voltage to the dryer, it will not run.
These recommendations for TROUBLESHOOTING are not all inclusive as different manufacturer models vary in components and configuration. However, the general cleaning maintenance and proper ventilation requirements should apply to ALL dryers.
Preventing Dryer Fires
One of the ways that dryers can start household fires is by igniting the excess lint that accumulates around the motor, burner shroud (for gas dryers) and cabinet interior. Lint is composed of very small, dry clothing particles which includes cotton and polyesters–both very good fires starters. Polyesters are particularly pernicious fires starters and are very difficult to extinguish once they ignite. Polyesters, vinyl in particular, pose another fire hazard when used as vent hoses, which we’ll talk more about later in this article.
There are three things you can do to prevent the threat of fire from accumulated lint inside your dryer. First, clean your lint filter before every load. This will minimize the lint blow-by around the filter and save energy by helping the dryer run more efficiently.
Second, inspect your lint filter each time you pull it out. If you see any rips or distortions in the screen, replace the filter immediately.
Finally, have your dryer professionally disassembled and cleaned annually. A thorough professional cleaning removes accumulated lint and dirt from the dryer cabinet interior, motor, and burner or heating elements. If you’d like to do this cleaning yourself, this page will help you disassemble your dryer. In addition to substantially reducing the risk of dryer fires, this type of regular cleaning will help the drum bearings and rollers last longer, preventing or minimizing future service calls. Many dryer installations use the common, cheap white vinyl vent hose for the dryer exhaust. These hoses were never UL-approved for dryer installations and are increasingly being recognized by local building codes as fire hazards.
 The American Household Appliance Manufacturers Association (AHAM) recommends the use of rigid aluminum ducts, such as shown here. For any dryer, but especially gas dryers, white vinyl vent hose should never be used and if yours has this installed on it, replace it ASAP with approved materials.
There’s alot more to dryer venting that just running a collapsible hose. In addition to the type of allowable materials for the vent, there are all kinds of specifications for length and the number of allowable elbows and bends. All this is to ensure that air can move through the vent with sufficient velocity to prevent lint accumulation and dry the clothes in the shortest amount of time possible. Read more about dryer venting on this page.
 One of the biggest causes of vent hose fires is the ignition of accumulated lint inside the vent hose. Lint gets caught in the folds and creases and sticks there because of the humidity. Over time, the lint builds up to such a degree that the dryer cannot exhaust properly. This results in increased drying times initially and, ultimately, in a fire. Once a fire starts in a vinyl vent hose, the hose itself ignites and burns vigorously creating a fire that is very difficult to extinguish. The defense here is to clean your dryer vent out twice a year using a dryer vent lint brush
How to re-wire a 3/4 prong 240 volt power cord
This advice is on how to correctly install an ELECTRIC DRYER or
3-Prong or 4-Prong – The Difference:
3-prong color code:
BLACK (HOT – 110-120VAC) – May also be referred to as L1
RED (HOT – 110-120VAC) – May also be referred to as L2
WHITE (NEUTRAL – 0VAC) – Usually grounded to the equipment frame via a jumper wire or metal strap.
4-prong color code:
BLACK (HOT – 110-120VAC) – May also be referred to as L1
RED (HOT – 110-120VAC) – May also be referred to as L2
WHITE (NEUTRAL – 0VAC) – DO NOT ground to equipment frame.
GREEN (GROUND) – Attach to equipment frame.
Which One to Use: According to the National Electrical Code (NEC), Article 250, installations after the year 2000, require the use of a 4-prong plug which incorporates a separate ground and neutral wire. If you currently have a home that uses the 3-prong receptacle and cord, you can continue to use it. You will have to upgrade to a 4-prong configuration, however, if you plan on relocating your current receptacle, or if the internal wires of the receptacle become damaged in any way and require repair.
Converting from 3-prong to 4-prong: Make sure you UNPLUG the appliance prior to any repairs. CAUTION: Voltages dangerous to life are still present even with the appliance turned off and still plugged in. Notably in the area of the terminal block where the power cords are installed. You will need to remove the old cord by following these steps:
These steps will work for nearly all appliances that require a 220-240VAC power cord conversion. The power cords are usually rated at 250VAC, 30 amps, and are carried by any hardware store or appliance parts retailer.
ADDITIONAL NOTES:
Major Links
-
Appliance Parts:www.apdepot.com
-
Appliance Parts: www.apwagner.com/
- Appliance Parts:www.cheapapplianceparts.com/
- Appliance Parts:www.easyapplianceparts.com
- ApplianceJunk.com - Appliance repair forum with manual downloads and instructional videos.
-
Belt Installation Diagrams: www.affordableappliance.com/Tips/beltdiagrams.htm
-
Fault Codes: www.affordableappliance.com/Tips/faultcodes.htm
-
Fault Codes: www.applianceaid.com/fault_codes.html
- Home Appliances - Washing machines, kitchen appliances, stoves, electronics
-
KitchenAid Mixer Parts/Service Help: www.appliancefactoryparts.com/applianceshvac/mixer-parts/index.html
-
Model Number Locator: www.affordableappliance.com/Tips/modelnumbers.htm
- Maytag Manuals: http://laundry.manualsonline.com/manuals/mfg/maytag/maytag_washerdryer_product_list.html
- Maytag Service Library: www.servicematters.com/maytag_library/html/index.html
-
Manufacturing Date Codes: www.appliance411.com/service/date-code.php 14/#more-14
-
Meters for anything: http://www.omega.com/toc_asp/subsectionSC.asp?subsection=J&book=vhtm&all=1
-
On-Line Repair Help: www.justanswer.comParts and Service Assistant: www.repairclinic.comParts:www.partselect.comParts: www.partstap.comParts/Service Assistant:http://forum.appliancepartspros.com/blog/dryer-repair/gas-dryer-not-heating-properly-Repair Help: www.affordableappliance.com/helpful.htm
-
Service Assistant: http://fixitnow.com/
-
Repair Avenue - Appliance information center.
Service Center Locators Team
- www.homeblue.com/appliances-1-repairb.htm
- www.sears.com/shc/s/nb_10153_12605_NB_RequestRepair
- www.servicelive.com/MarketFrontend/joinNowBuyerSimpleAction.action
- www.servicemagic.com